Monday, November 21, 2011

Growing Mint As A Wonderful Edging Plant


If there is only one type of herb I am allowed to grow, without a doubt mint will be my top choice. I just love mint! I bought two pots of lush and healthy mint plant a while back, separated them into several clumps and replanted them in the narrow strip of soil at my porch.

They spread so fast and within a month, this lovely herb has shrouded over almost the entire strip. Mint is just perfect to be grown as edging plant.

If I have a big garden, I would even dedicate a huge patch just for mint and I wouldn't inhibit its growth. Whenever I need an aromatic whiff of it, all I need to do is to give the plant a gentle shake and its lovely minty fragrance will waft through the air. But if its a breezy day, I just need to stand near it to smell it. Aghhhh...lovely!

Mint leaves are great addition to a cup of tea. Chop some and throw in a salad is another delightful and easy to use option.

A lovely pot of mint at just RM5.00 which I bought at a nearby local nursery


I tore the plants into clumps and replanted them in the ground on 11 Sept 2011


Photos below were taken end of last month, October. Show just how fast mint can spread. Mint needs well-drained soil and a light occasional feed of fertilizer.


However as of today, I'm sad to say that so many of my mint leaves have been eaten by bugs - must be grasshoppers and caterpillars. My sister spotted two baby caterpillars today. Guess I'm not the only one who loves mint. Sigh...hope they will grow new shoots soon and be lush again.

Till then, happy gardening. Next up will be an update on my container veggies, in particular celery!!

Saturday, October 29, 2011

Growing Turmeric Rhizomes

Yesterday was a happy day of 'yellow discovery'!

I got the grass cutter man to come over yesterday to clear the messy and uncontrolled weeds that have taken over my whole backyard. The current rainy season has sped up the foliage growth and it was an eye sore. Anyway, I had a new garden idea so I needed to get the mess cleared real quick before my enthusiasm fades away.

After the weeds were cleared, I spotted something bright yellow just slightly above the soil surface. I remembered I had buried 2 small knobs of turmeric rhizomes last year and knew that perhaps they had grown bigger since the turmeric leaves have all wilted off. Armed with a garden scraper I dug out that small patch and I found a turmeric. Then, it seems like there was another one next to it as I cleared off more earth. I continued to dig. And I found not one but another 3 knobs of this yellow treasures! On what seems like an endless joy, I found more and more of these rhizomes! I followed the trail of the roots underneath the soil and found a huge clump of rhizomes a feet away from the first spot. It was such a surprising and truly joyful find indeed!!

I collected almost a colander full of turmeric!!! Woooohhhhooooo!!! I did not expect that they could grow, much less multiply to so many, under the clay-like soil condition. What started as an experiment ended up as a victory yield and I am a very happy home gardener now :D)))

1. Freshly dug out turmeric rhizomes

2. All washed and ready to be sun-dried for a while

3. I collected almost 700 g of turmeric

How to grow turmeric:

Turmeric is actually the rhizome of the turmeric plant, much like ginger. Apparently these two plants belong to the same family.

Start by buying a fresh clump of turmeric from the market and nib off the small rhizomes where a bud or two have started to show. Plant the rhizomes about 2 inches in the soil and about 20 cm apart. Loamy and fertile soil are best for growing turmeric. It also needs full sunlight. Slight shade will not do any harm but it won't thrive under heavy shade. It takes about a year for the rhizomes to multiply underneath the soil.

The plant will grow bearing very fragrant long leaves that are commonly used in Asian cooking. Some plants will bear pretty flowers too. The plant itself is pretty and ornamental.

Turmeric is a key ingredient in curry recipes as well as in many of my Nyonya culture cuisine. It is said to carry a natural antiseptic property beneficial for healing wounds. Looks like I'll be doing quite a bit of spice blending in my kitchen this week. Yippee!!! I'm so happy!

Seriously, growing turmeric is so easy and maintenance-free! Now I can't wait to harvest my ginger which I planted in a container.

Happy gardening!

Sunday, October 02, 2011

Capsicum

Each time I visit some of my favorite garden & veggie patch blogs, I get so envious (in a good way of course :) of the gardening space they have and the variety of plants they could grow which of course leads to bountiful harvest. As much as I would love to have a spacious garden, I can only be satisfied with my plants in my containers and cherish my small harvest from time to time.

For now, one of my containers is growing capsicum. I am happy that it works out so I've sowed some more seeds in 4 other containers. I guess other plants will have to wait for its turn to occupy the pots.

This is my second capsicum and I've eaten it before the ants could damage it, like my first capsicum. I hate those pesky ants! The crawl all over my capsicum and chili plants and they encourage the growth of the white powdery mildew. What I did was to boil a few dried chilies and use the water mixed with a few drops of dishwater liquid and cooking oil, give it a good shake and spray at the ants and powdery mildew on infected plant. This needs to be done every day in the morning or evening until the disease is gone. I tend to forget and the disease multiplied before I could control it. That was what happened to my beautiful marigold plants that I had to sadly pull out last month. If anyone has more lethal solution to get rid of ants and the powdery mildew insect...please please share :D!


I am really getting a hang at growing capsicums now. It was sweet and crunchy but a little thin. I should perhaps use more organic fertiliser to fatten it.


Capsicums are really easy to grow. Just scatter the seeds of a capsicum that you buy from the market and they will sprout in less than a week. It's easy to care too...just water as normal and feed with fertiliser once every 2 weeks.

Friday, July 29, 2011

Chillies & Some Green Edibles

Growing edibles in containers/pots gives a lot of versatility, although there are some limitations. Oh well, nevermind the limitations, I prefer to look at the positive sides of it. Resorting to growing in pots placed around my front porch gives me more control with regard to pest/disease control and fertiliser usage (can use less as the fertiliser is contained in the pot and does not get washed away).

I have had wonderful successes growing tomatoes in containers, and Asian spinach (bayam). Bayam grow so easily. Some of the earlier seeds which remained dormant are now growing in my other plant pots after I did some repotting of soil. Isn't that lovely. After I have harvested my 2nd batch of bayam (below pic), I am still getting some more growing out of nowhere.


Recent harvest. Top left are 2 stalks of crinkled pak choy; top right are bayams; bottom are 2 ladies' fingers (okra) and tomatoes.

I'm now growing three types of chilli plants. 2 out of the 3 types are growing in the same pot, just to make use of the available space. As expected I get smaller plants as they both compete for nutrients in the same pot but they still bear quite a number of chillies so it's fine by me. In the other pot is the 3rd type of chilli, looks somewhat like a miniature pointed capsicum. Here they are:


This above is the 1st type. It's bird's eye chilli that grows upwards. Below is the 2nd type, which grow downwards. Both are growing in the same pot.


This one below is the 3rd type. They're so cute!! I plucked the reds ones but much to my disappointment, a few were hollow inside and 1 had a worm inside. I saw tiny holes on the surface of the chillies and I knew immediately who the culprits were. ANTS!! I can't stand ants. Whether on plants or in the kitchen or wherever. On plants, they are the main cause of aphid disease!!


Below: Bayam growing randomly in my calamansi and rose pots...


Ok, I'm off to go make some burning hot organic concoction specially for the ants. Will share in my next post.

Enjoy gardening!

Thursday, June 02, 2011

Seeds Frenzy & Other Stuff Growing

It's been over a month since my last update on what I call 'burnt bottom tomatoes'. Thanks to all who posted comments to enlighten me on what the burnt bottom actually was and what caused it. Thinking back, I may have applied a tad too much of nitrogen-rich fertilizer on my tomato plant. Since my last update till now, I have harvested a bunch of my cute cherry tomatoes, a couple of my burnt bottom tomatoes, a tiny white radish and some stalks of Asian spinach (bayam). Now, I'm all ready to widen my horizon and grow more of other edible stuff with the variety of seeds I bought while on a work trip in London last week. In fact, I think I could almost open a farm with the amount of seeds I bought. I just can't help myself. Not only is the packaging attractive, they're cheap too. Got these at only 1 pound per packet at Poundland, where everything is priced at 1 pound. Here are the packets of seeds I bought...;D


To mention a few, the seeds above include broad beans, dwarf beans, italian beans, carrots, beetroot, broccoli, cabbage, cauliflower, tomatoes (moneymaker, sunbaby, garden pearl, gardener's delight and marmande), onion and herbs (basil, rocket salad, coriander, parsley, mint and thyme). I'm not even sure if all of these will grow, but gardening is all about trial and error, success and failure..so what the heck!!

I've cleared my cherry tomato plants as their time was up but the same 'burnt bottom tomato' plant is still standing and bearing some more luscious tomatoes for me. I came back from London on Monday night to find them delightfully ripe and red. Oh, here they are :)...(in the chicken curry pot these will go this weekend)


My pak choy are also growing well. One container has a few pak choy growing and ready for harvest in the next 1-2 weeks and the other with young plants still growing. As veggies like pak choy mature within 1-2 months, they are usually heavy feeders, thus fertilizer needs to be applied every other week. I use organic chicken manure.


Below are two ginger plants. They were planted at the same time but one is growing well while the other seems to be growing really slow. It's been about 2.5 months now but I hope the rhizomes are developing well underneath the soil. I really look forward to the day I can dig them out. Surrounding the ginger are pak choy. Just trying to make use of every inch of space I have in the container.


Happy gardening and more updates later!

Friday, April 15, 2011

'Burnt Bottom' Tomatoes


My joy with the four tomatoes growing nicely on one of my tomato plants is in question right now.

I spotted 'burnt bottom' on two of the tomatoes. So weird!

The other two are so far so good. Too much fertiliser? Too little water? Too much sun (which I doubt)? A kind of disease?

I am clueless.

If you have any ideas why and how this happened and what I can do to prevent this, please feel free to share.


Sunday, March 13, 2011

A Hibiscus

It is a somber weekend as the world's attention is gripped by the unfortunate quake and tsunami devastations in Japan.

My heart and prayers go out to all those who are directly and indirectly affected.

I would like to dedicated this pretty hibiscus to all the victims - may all those whose lives were claimed be at peace, and may all next of kins and those who survived such harrowing experience be strong in moving on.


Tuesday, March 01, 2011

Growing Cherry Tomatoes

I'm currently hooked on growing cherry tomatoes after my recent success. It all started very simply and without any expectations at all. I had bought a pack of grape cherry tomatoes from the supermarket one day. While most went into the cooking pot, one got split opened and seeds scattered onto the soil in planting pots. A week later, some of the seeds sprouted and I thinned out by keeping 3-4 stronger baby plants. To my joy, the plants grew quite quickly. Within 2 months, they started to produce flowers. A short 2 weeks later, tiny cherry tomatoes had formed. They are so cute and what I like most is that they grow in bunches. I thought they looked just like green grapes before their ripening process. My experience from growing cherry tomatoes is quite different from growing the larger singly tomato (see my other tomato post) which took a longer time to grow, flower and produce fruit.

These are pictures from my 1st harvest of tomatoes that had ripened on the vine. My plants have grown really tall and I keep having to extend the height of the stake to support the plants. Think they've grown to more than 6 feet tall now. From one of these cuties, I repeated the process of scattering the seeds in other pots. They have sprouted and I can't wait to relive my experience in growing these wonderful cherry tomatoes.

I used some of these tomatoes to decorate my onion, bacon and parmesan cheese tart. Please hop over to my food blog for pictures and recipe of the tart.


Tuesday, February 15, 2011

Lotus

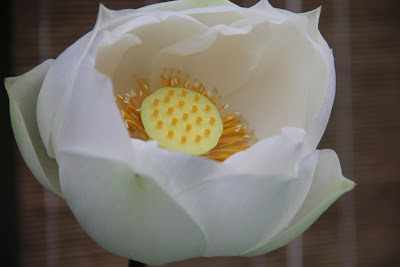
Lotus flowers are one of the most beautiful ever created by mother nature. Each bloom conjures up images of beauty, grace and calm. An important symbol in Buddhism, it signifies purity free from all defilement of greed, hatred and delusion, the bad roots of human sufferings.

Lotus plants are grown commercially in large ponds for its flowers and edible roots. The lotus roots are long tubers favored by the Chinese people who would use them in soups or stir fries.

The lotus plant make a beautiful addition to the home garden. It adds a certain charm and serenity for sure. A lotus bloom not only pleases the eyes but enchants the heart and contents the senses with its soft, subtle fragrance.

I bought this white lotus plant at a nursery on the last day of 2010. It already has a full flower bud ready to bloom. The bud 'said hello' to me 5 days later (pictures below).


Lotus plants thrive in clay, muddy soil and must be contained in water. The plant requires full sun and will not thrive in shaded spots. Tablet fertiliser specially for lotus can be used once every 3-4 weeks.


The petals are soft and gentle, with feminine curves. The downside is that the lotus bloom does not last very long. After a day or so, the petals would begin to dislodge, leaving the pod to dry off on the stem.


Lotus blooms are very fragrant. I could never get enough of smelling this bloom.


I read that lotus plant is pretty tricky to grow from pod seed. I collected the dried pod from this pretty bloom and perhaps I shall try to sprout it someday soon.


Just like the lotus, have a beautiful day and hope you've enjoyed the pictures.

Monday, February 07, 2011

I Can't Bear To Pluck It, But I Did!

I ate my first home-grown organic tomato last week! It wasn't big but it was so cute and pretty, so sweet, tasty and delicious! I treasured it so much that I couldn't bear to pluck it off the plant, let alone eat it. After admiring it for the longest time, I finally ate it! I cut it into two and shared with my hubby, and we ate it with fried rice. Yummy! Now I know what it meant when blogging home gardeners said they would never buy supermarket tomatoes anymore after successfully growing their own.

Technically, this is my second tomato plant. The first one died on me after I raked the surface of the soil around the plant to aerate it. That plant was already flowering and I thought by raking the surface of the soil before scattering some fertiliser would help. Sadly, a few days later the plant died. I guess some of the roots got broken. So, never rake the soil around your tomato plant.

I don't have the variety name of my tomato but all I know is it's the local variety commonly sold in Malaysia. It was grown from seed given to me by my sister, My Little Potted Garden. The fruits do not grow in clumps like cherry tomatoes do but rather, a single fruit on each stem. The first one which grew was the largest and the other nine that I have from this same plant were much smaller - just slightly larger than cherry tomatoes!

Tomato plants need very well-fertilised soil. I use pelleted organic chicken fertiliser every other week. I also scattered broken egg shells around the plant once in a while.

I also have three cherry tomato plants (grape variety) with bunches of tomatoes growing and ripening on the vine. I can't wait to harvest them and taste how good they are.

My first tomato


Two more grew while the first one begun its ripening process


More orangy in colour now


It has ripened! So so pretty and luscious looking!


By the time my first tomato was ready to be plucked, more tomatoes were already growing.


All my tomato plants are grown in containers.

Monday, January 31, 2011

White Radish


A gardening frenzy caught on me lately. I would sit in the office and day dream ambitiously (often after lunch!) about transforming my subfertile backyard into a lush, verdant patch of edible greens, fruit orchard and flowers oh glorious flowers everywhere!

As I'm new at gardening, needless to say that there will be many 'first time' plants I'm going to write about in this blog - at least for the next several posts. Like my sunflower and chili plants in my first two posts below, this was also my first time growing white radish.

Before I discuss my white radish planting experience, allow me to mention that I've also had my maiden attempt at growing carrots, last year. It was such a joyful experience and something I'd like to repeat again soon. My carrot post (mutated carrots to be exact!) is on my cooking blog. Click HERE if you wanna read about it. The flowers of carrot plants are just beautiful. If you haven't seen it before, do HOP OVER.

Okay, back to my white radish. As many already know, there are several variety of radish - varies by color, shape and sizes. The variety I've always eaten is the elongated white radish which is also commonly known as daikon. I did some reading on the web prior to planting them and most articles said that radishes are the easiest and fastest to grow - all of about 1 month from sowing to harvesting. I was excited at how fast I could reap the rewards. Seeing pictures on blogs and websites of the roots protruding a few centimetres above the soil truly intrigued me and that really added to my excitement. Infact, I've never seen a root plant that protrudes upwards like white radish does. I've also read that they grow so easily in containers, as long as the containers are deep enough.

So, with all the excitement and anticipation of what I could harvest in a month's time, I embarked by sowing four seeds from a packet of white radish seeds I had bought at the gardening section of Jaya Jusco mall. I sowed them in a paint bucket using black fertilised loose soil I had bought from a nearby nursery. And here is my experience (all of NOT in a month)...


Radish seedlings ~ about 1.5 weeks old
Young plants ~ about 3.5 weeks old


Looking promising! Radish leaves can be eaten, normally stir-fried. These are about 1.3 months old. I took a peep at the roots but there was no sign of radish at all during this stage. Hmmm... So I added some organic fertilizer again and let them be.


After about 2 months, the roots started to show. I was elated!! I curiously wondered how long they were growing beneath. "They must be quite huge" ~ I had thought to myself since the top parts protruded well.


I was looking forward to a huge pot of radish soup, boiled with pork ribs!! Slurppp!!


But that was not to be! I got duped!


Coz all I got was three teeny weeny 'dimensionally challenged' radishes after I dug them out. The ballpoint pen by the side gives you a gauge of their sizes. Nevertheless, it was quite a joyful experience along the way. I brought these home on my trip back to my hometown, bought another radish from the supermarket to add to these three cuties and in the soup pot they went. Although these were small in size but they were really sweet and delicious in taste.
I certainly plan to grow more real soon.


Growing these radishes took me about 2.5 months from seed sowing to harvesting - unlike what the articles and information on the seed packet said. But it's okay, the process and experience are quite fun.

I've bought another packet of seeds (different brand) and have sowed 3 seeds which sprouted. Hoping that these future radishes will give me larger yields.

Till then, happy planting!